 Tesseract
How Tesseract's Enhance a photo maker fixes a photo
Enhance a photo measures your picture, plans only the fixes it needs, runs them in a fixed order, mostly on your computer, and shows a before and after.
The Enhance a photo maker on Tesseract’s Home measures your photo on your computer, plans the few fixes it needs, and runs them in a fixed order. Light, colour, sharpening, the cut-out and enlarging run locally at no cost. Restoring, colourising, retouching and restyling use an image model. You compare the result with a slider, then save it beside your untouched original.
This post covers what the maker does, step by step: how it measures a photo instead of guessing, why the order of the steps is fixed in code rather than left to a model, how enlarging runs locally on your graphics card, and how changes keep the work already done.
What is the Enhance a photo maker?
It’s one of the guided makers on Home: a conversation that turns into a photo being fixed. You give it a photo by attaching it, pasting it or choosing a file, and you say what you want: “brighter”, “sharper”, “big enough to print”, “restore it”, “the background gone”. The order doesn’t matter, and whichever is missing, the maker asks for. If you give only the photo, it does what the photo plainly needs. It reads JPEG, PNG and WebP.
The start screen offers four examples: restore an old family photo, brighten a dark photo and fix its colours, make a small photo big enough to print, and cut out the background of a product photo.
From there, the work happens in a card beside the chat. First comes the plan, then each step as it runs, and finally the result, with a slider across it to compare before and after. The enhanced copy also opens in Tesseract’s image editor in the same card, so a crop, a spot or a curve is one click away.
Your own file is never touched. The maker keeps everything in a folder of its own under Documents › Tesseract › Enhanced Photos: a copy of the original, every step’s result as a numbered file, and the finished copy.
How does it decide what a photo needs?
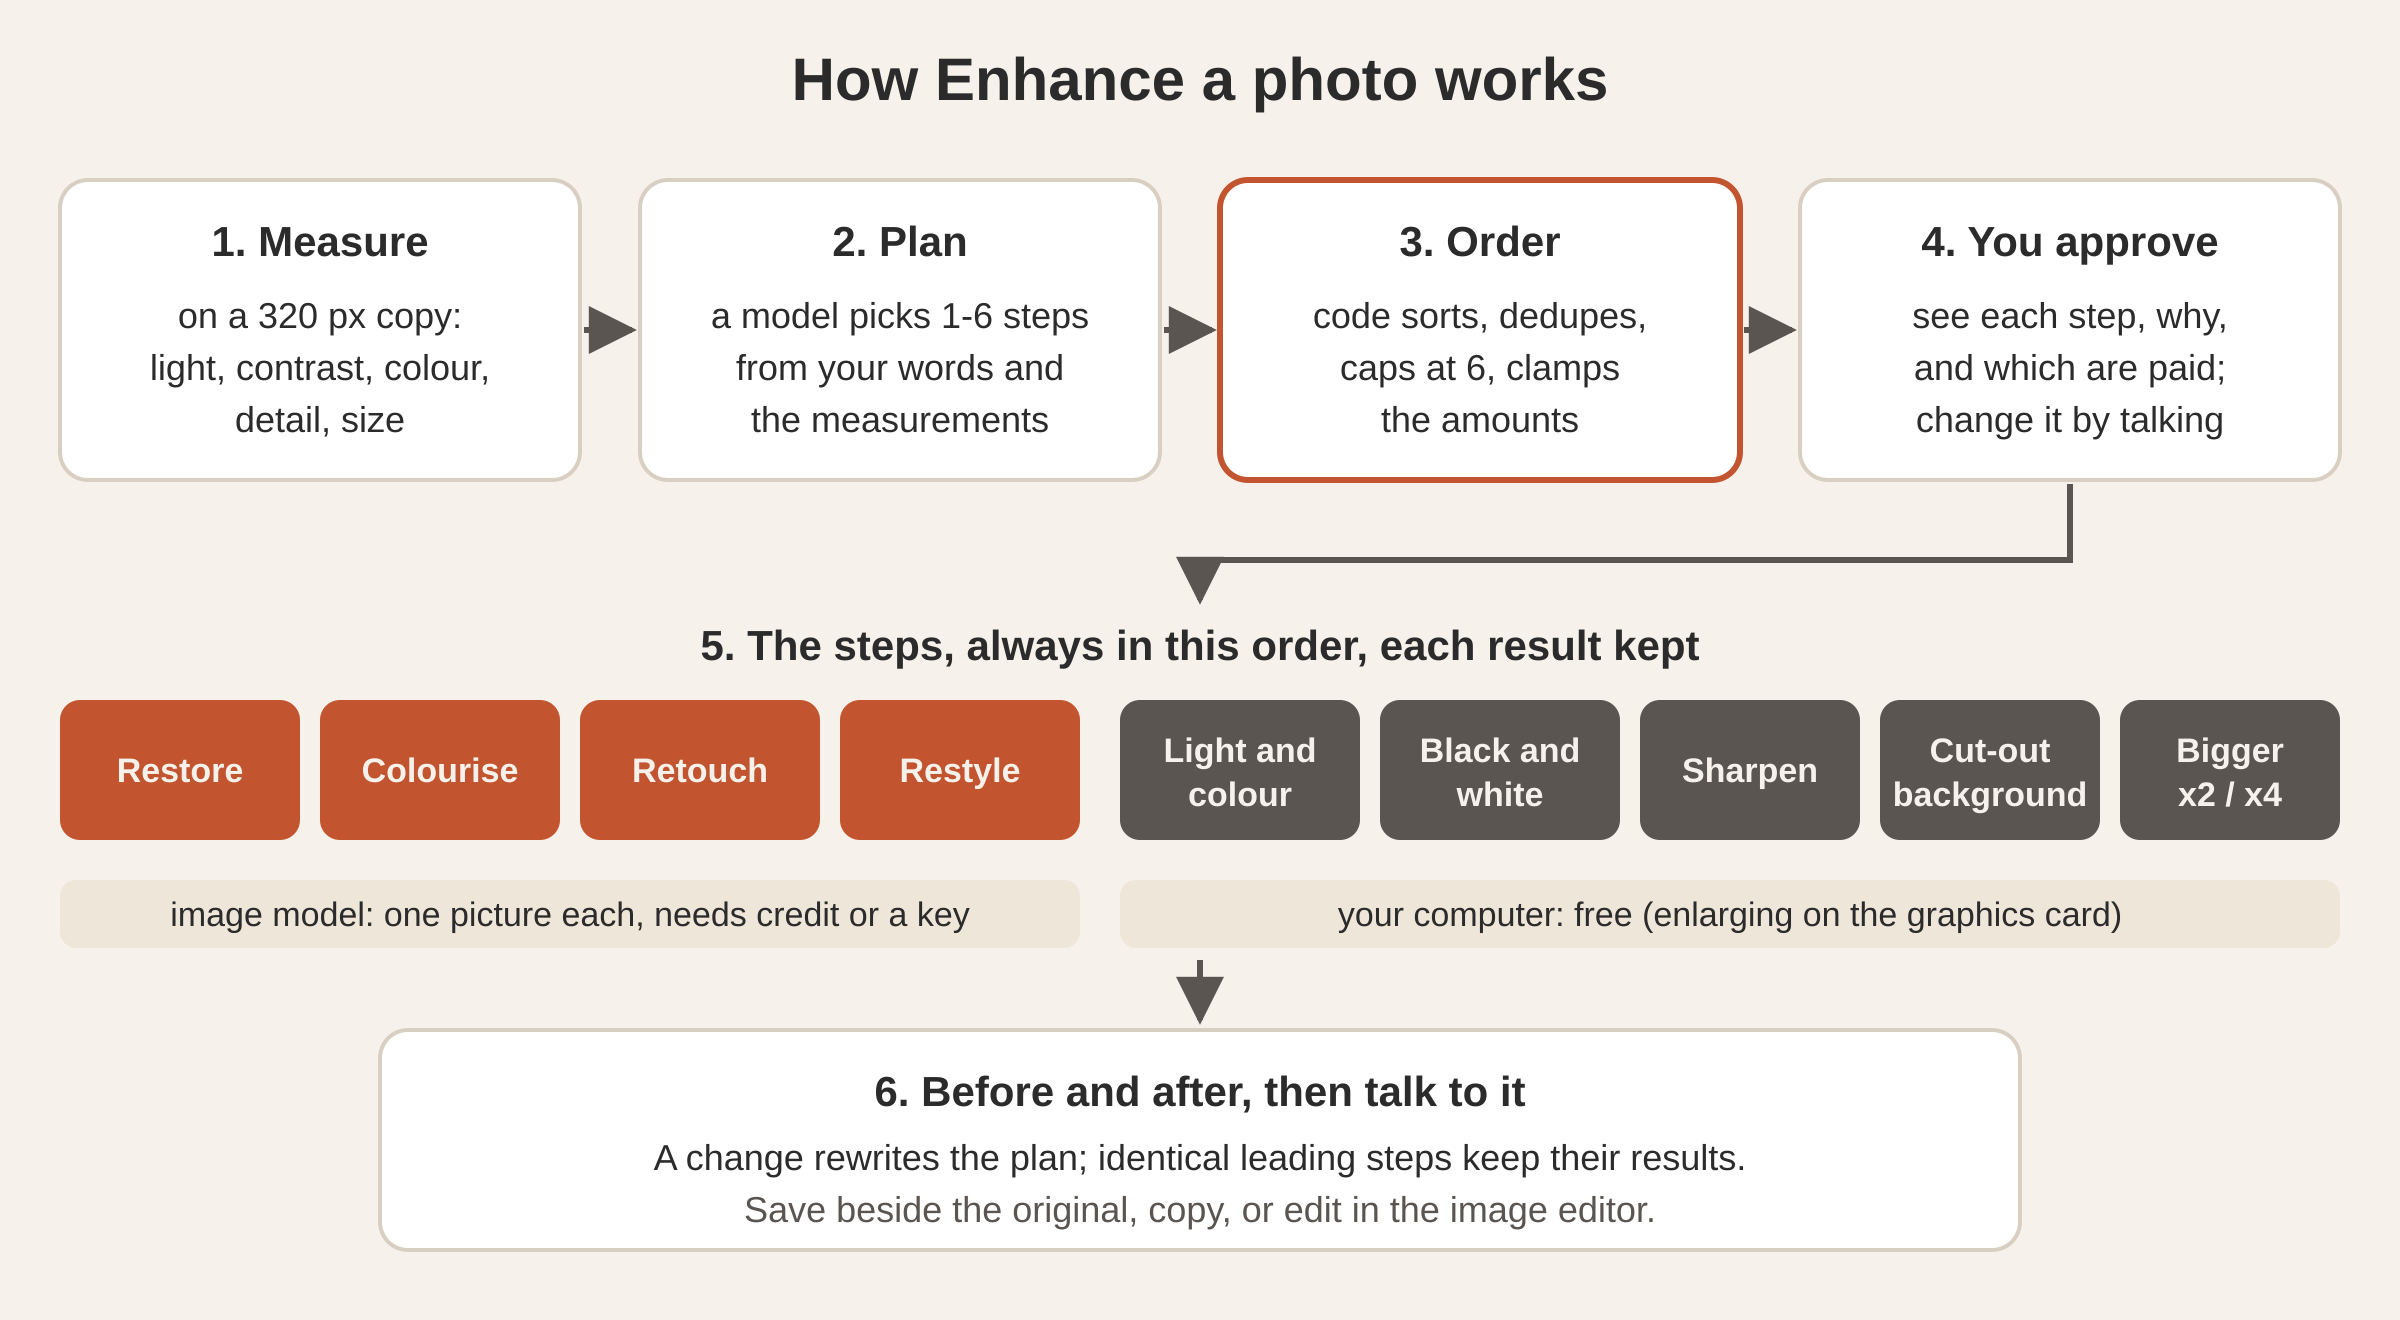
Before planning anything, the maker measures the photo. It draws the photo onto a copy at most 320 pixels on its long side and computes five numbers:
| Measure | How | Read as |
|---|---|---|
| Brightness | Mean luminance, Rec. 709 weights (0.2126 R + 0.7152 G + 0.0722 B) | under 0.36 dark; over 0.72 bright, perhaps washed out |
| Contrast | Standard deviation of luminance | under 0.13 flat; over 0.30 strong |
| Colour | Mean saturation | under 0.15 dull or faded; over 0.55 vivid |
| Detail | Mean edge strength (each pixel against its four neighbours) | under 0.025 soft or blurry; over 0.07 crisp |
| Black and white | Channel differences and saturation both near zero | grey, or colour |
The luminance weights are the ones defined in ITU-R BT.709. The size is read from the full photo: under 1,000 pixels on its long side is small, under 2,000 is medium, and anything larger is large.
The numbers become one plain sentence, such as “800 × 600 px (small); dark (brightness 0.31); flat, low contrast; dull, faded colour; soft or blurry.” That sentence goes to a planner along with your words. The planner is the conversation’s own model, asked for a structured answer, and its instructions are those of a retoucher: choose the few steps that will make this photo what you want, never a step it doesn’t need, and never a change you didn’t ask for.
The answer comes back as data, not prose: one to six steps, each with a short reason in your language. A light step also carries how far past the automatic fix to go, for “a bit brighter” or “warmer”. Retouch and restyle steps carry an instruction. An enlarge step carries ×2 or ×4. You see the plan and its reasons before anything is spent, and you can change it by talking.
What steps can a plan contain?
There are nine, and they always run in this order:
| # | Step | Where it runs | What it does |
|---|---|---|---|
| 1 | Restore | Image model | Mends scratches, dust, tears and fading |
| 2 | Colourise | Image model | Natural colour for a black-and-white photo |
| 3 | Retouch | Image model | Takes something out or fixes a detail you named |
| 4 | Restyle | Image model | Redraws it as a painting, a sketch and so on |
| 5 | Light and colour | Your computer | Automatic levels per channel, then your brighter, warmer or more-colour adjustment |
| 6 | Black and white | Your computer | A rich black-and-white with a little extra contrast |
| 7 | Sharpen | Your computer | Crisper detail |
| 8 | Remove the background | Your computer | A cut-out with a see-through background |
| 9 | Make it bigger | Your computer (graphics card) | ×2 or ×4 |
The planner has rules for when to choose each step. Restore only applies to an old, damaged or faded print or scan. Colourise only applies to a black-and-white photo you want in colour. Retouch and restyle only happen when you ask. Sharpen is chosen only when nothing else will repair the softness, because restoring already sharpens. Enlarging is chosen when the photo is small (under about 1,500 pixels on its long side) or when you want it bigger or printed.
Why is the order fixed in code?
A model asked for a list of steps will give them in whatever order reads well. Photo work has an order that works: repair before you sharpen, and make the picture bigger last. The maker’s order follows from that:
- The model’s repairs first, at the photo’s own size. Restore, colourise, retouch and restyle work on the photo as it is.
- Then light and colour, then sharpening, then the cut-out. These are the local steps that work on the repaired picture.
- Enlarge last, so no step after it has to work on millions of pixels.
So the planner chooses which steps, and the code decides when. Whatever the model returns is filtered to known steps and de-duplicated, then sorted into the fixed order and capped at six. The amounts are clamped too: brightness and colour to ±40, warmth to ±30, relative to the automatic fix. So every plan is one this computer can carry out.
Which steps cost something, and how does a run pick up again?
Five of the nine steps run on your computer at no cost: light and colour, black and white, sharpen, background removal and enlarging. The other four (restore, colourise, retouch and restyle) each make one picture with an image model. They need credit on your Tesseract account or an image key of your own. The plan shows which of its steps are which before you press Enhance it.
For a model step, the photo is sent at no more than 2,048 pixels on its long side, as a high-quality JPEG (or a PNG when it has see-through parts). The edit is requested in the shape closest to the photo’s: landscape, portrait or square. Each step’s instruction is written to protect the photo. Restore, for example, asks the model to keep every face, expression, pose, garment and the whole composition exactly as they are, to add and remove nothing, and to return a photograph, not an illustration.
When a model step needs more credit, what was already done stays done and is kept in the folder, and the maker shows a card for adding credit or a key. When you carry on, it picks up at that step.
How does it make a photo bigger on your own computer?
Enlarging uses Real-ESRGAN, an open-source super-resolution model under the BSD-3-Clause licence. Tesseract already ships it for its video enhancer, and it runs on your graphics card through Vulkan. Nothing is uploaded and nothing is charged.
Three details matter:
- It always works at ×4. A ×2 result is the ×4 output scaled down by half with a high-quality resize. That comes out sharper than a model drawing ×2 directly.
- It picks the right model for the picture. It uses the photo model normally, and the illustration model when the plan includes a restyle, because a redrawn painting isn’t a photo.
- It sizes the work to the photo. A photo already more than 2,400 pixels on its long side is big enough as it is, so enlarging is kept for the photos that need it.
Model steps return a picture about 1,500 pixels wide. So when you want a large result, the planner adds an enlarge step after a model step.
How do you change the result?
When the steps are done, the card shows the result with a before-and-after slider. You can also compare any single step with the original. Then you talk to it: “brighter”, “no sharpening”, “now remove the background”, “make it four times bigger”.
What you type is read by the conversation’s model into a structured answer (a change, go ahead, save, copy, or a question to answer), not matched against a keyword list. A change rewrites the plan with that request and keeps the steps you didn’t ask to change.
Then comes the part that saves time and credit. The new plan is compared with the old one step by step from the start. Every leading step that is identical (same step, same instruction, same scale, same amounts) and already done keeps its result. Only the steps from the first difference onwards run again. Asking for “a bit warmer” after a restore re-runs the light step and what follows it, not the paid restore.
Save puts the finished copy beside the original in the folder, named after your photo with ”— enhanced”, and shows it in your file manager. Copy puts it on the clipboard. Edit brings the enhanced copy forward in the image editor, with its layers, tools and the Develop panel. If you change that copy in the editor and then ask the maker for another change, the newer result doesn’t overwrite your hand edits. It’s kept in the folder’s steps, and the maker tells you so.
A conversation in which something was enhanced is kept for a year, so you can come back and change it again.
Questions
Is my original file kept as it is? Yes. It copies the photo into its own folder and works on that copy. Each step’s result is kept there as a separate file, and the finished copy is saved beside the copied original.
Is enhancing free? Light and colour, black and white, sharpening, background removal and enlarging run on your computer at no cost. Restoring, colourising, retouching and restyling each make one picture with an image model and need credit or your own image key. The plan shows which steps are which before you start.
How does it know what my photo needs? It measures the photo’s brightness, contrast, colour, detail and size on your computer, then a model chooses the steps from those measurements and what you asked. You see the plan and its reasons first.
Can I undo one step? Yes. Say “no sharpening”, for example. The plan is rewritten without it, the steps before it keep their results, and only the steps after the change run again.
Can I edit the result by hand? Yes. The enhanced copy opens in Tesseract’s image editor beside the chat, with layers, retouching tools and Develop.
Try it
Open Tesseract, choose Enhance a photo on Home, and drop in the photo you’ve been meaning to fix. Download Tesseract for Mac, Windows or Linux, see what else it makes, or read whether you need an AI subscription to use it.