 Tesseract
How Tesseract generates images, transparency included
How the agent makes pictures in the chat: your provider setting, four at a time, files kept with the session, and a real transparent PNG from any model.
When you ask for a picture in a Tesseract chat, the agent checks that an image model is set up, then makes four pictures by default with the provider you picked in Settings, every time. The pictures are saved with the conversation. If you ask for a transparent background, you get a real alpha PNG from any image model.
This post covers how that works: how the request travels, why your provider setting always decides, why pictures travel as files rather than inline data, and the colour-keying maths that gives you a clean cut-out with soft edges from any model.
Where can you generate images in Tesseract?
There are three places, all using the same image machinery:
- In any chat. Ask “draw a fox in the snow” and the agent makes the pictures inside the conversation. Most of this post is about this path.
- The Generate an image maker on Home. A guided flow that asks what the picture is for, draws three takes at the exact shape of where it goes, and lets you change it by talking. Our post on the guided makers on Home walks through it. Below, we cover two tricks it relies on: drawing at the destination’s shape, and checking the words in a picture.
- The image editor. Its prompt box generates on a blank canvas and edits an open picture.
Each path ends in a file you own. You can open it in the image editor, save it anywhere or copy it.
What happens when you ask the agent for a picture?
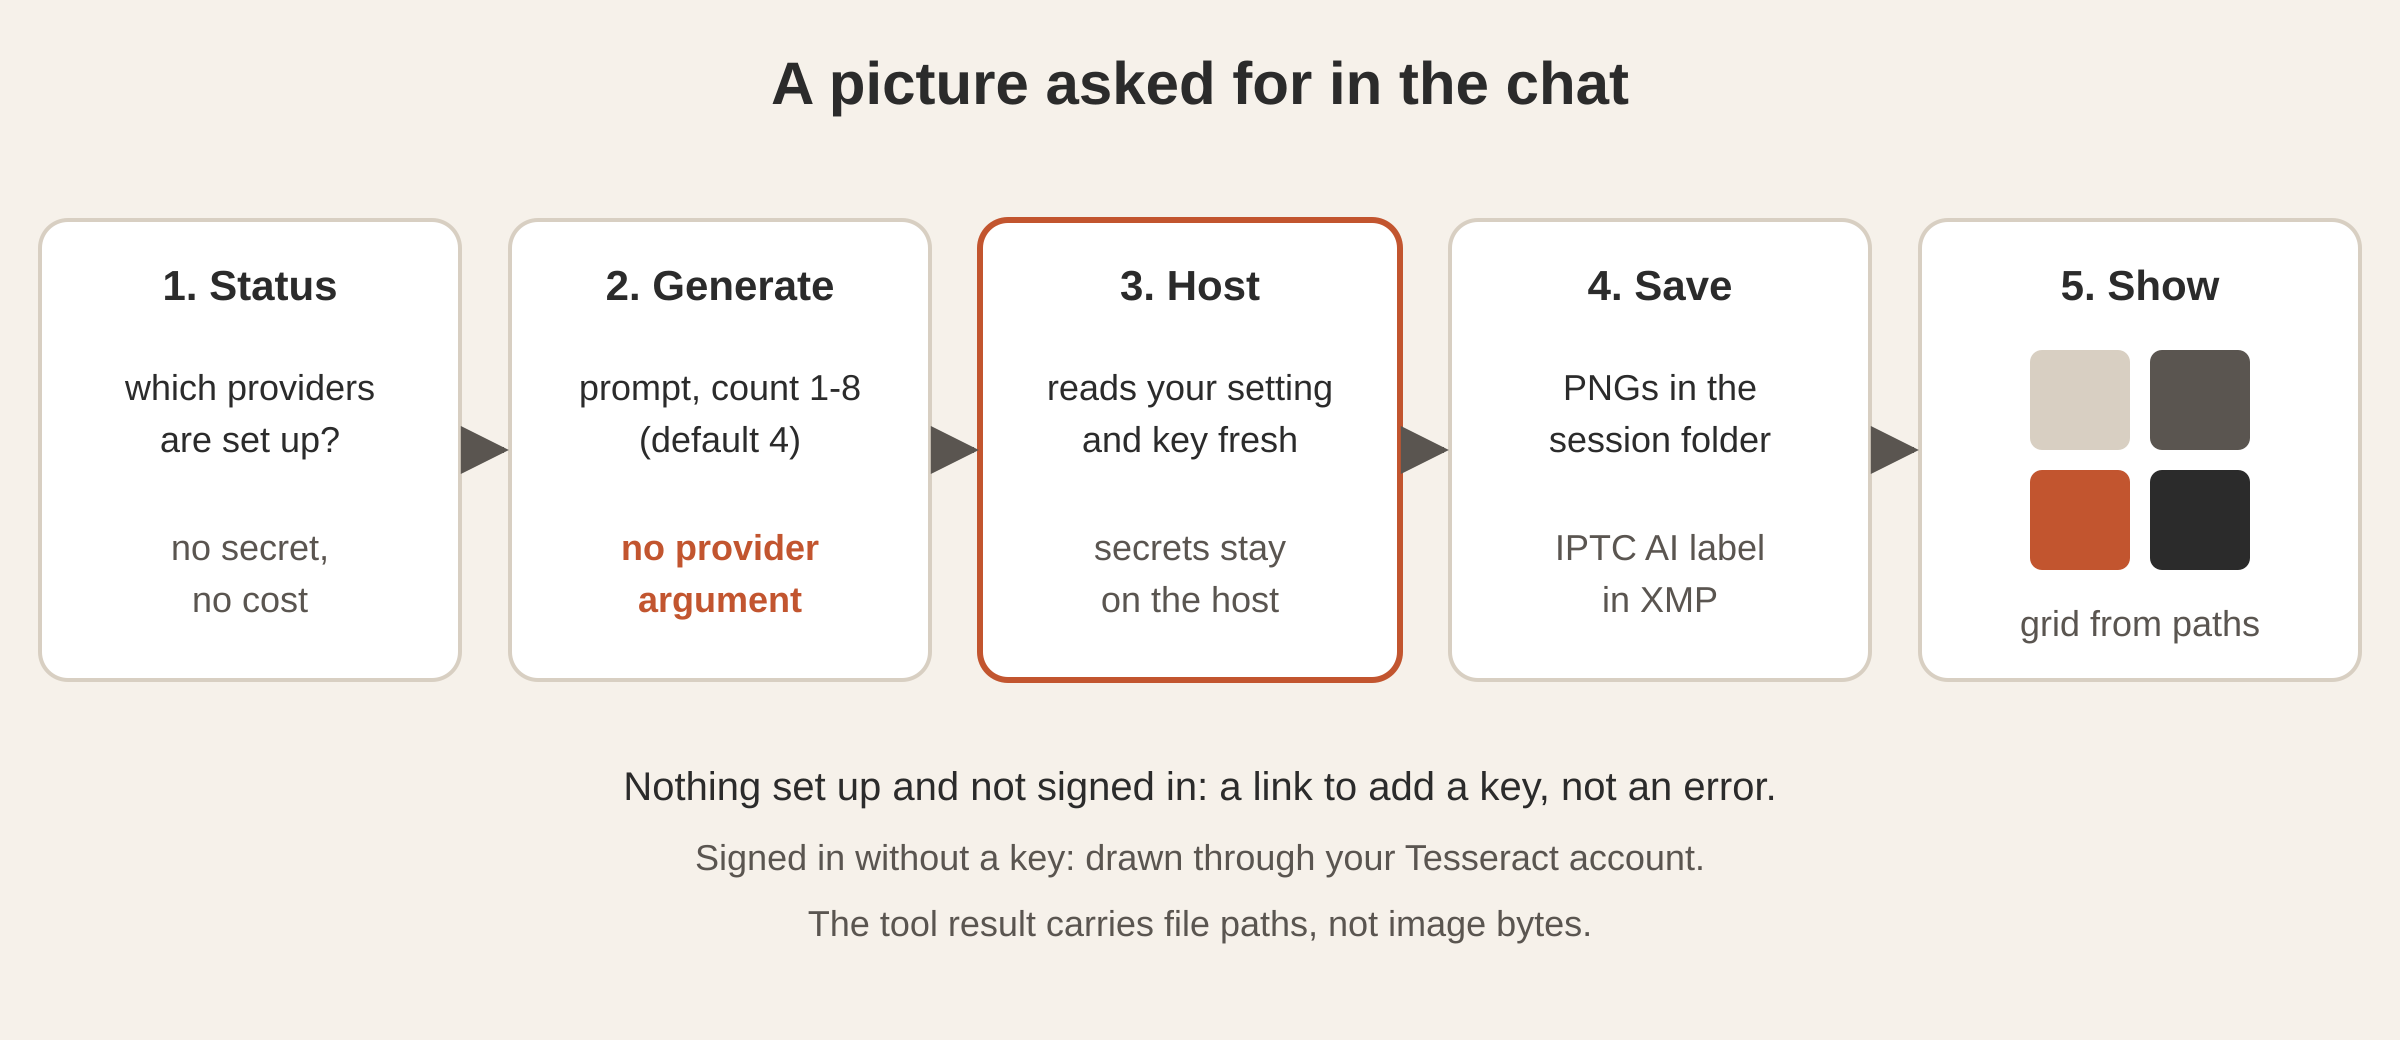
A built-in skill gives the agent the policy, and the flow runs in five steps:
- Check before drawing. The agent first calls a status tool that only answers which providers are configured. It returns no secret and costs nothing. If none is set up and you aren’t signed in, the agent answers with a link that opens Settings › Image editing to add a key.
- Draw. The agent calls the generate tool with your prompt and a count: 4 by default, anywhere from 1 to 8. It can pass a source picture (“variants of this”), reference pictures, and a transparent flag. The skill sets transparency on by default for icons, logos and sprites.
- Resolve the provider on the host. The part of the app that runs the agent reads your image settings fresh on every call. If you change a key mid-conversation, the next picture uses it. Secrets stay there and never pass through the conversation.
- Save and label. Each picture is written as a PNG into the conversation’s own folder. Before it’s saved, it gets an IPTC “trained algorithmic media” label in its XMP metadata naming the model, so any tool that reads IPTC can tell it was made by a model. The term is defined in the IPTC digital source type vocabulary.
- Show. The chat receives a picture surface that lists the file paths, and draws the grid from them.
If you’re signed in, the pictures can also be drawn through your Tesseract account’s image model, with no image key of your own.
Why does your setting pick the provider?
Tesseract works with two image providers on your own key, plus your Tesseract account. Which one draws is your setting: a default provider, and a model override for each provider if you want one. The generate tool has no provider or model argument at all.
That choice is deliberate. With no argument to pass, your setting is always the one that draws, and the skill tells the agent never to ask. If you have keys for both providers, the one set as default draws. If only one is configured, that one draws.
The two providers behave differently, and the tool hides the difference. One returns all four pictures from a single request. The other draws one picture per request, so the host sends four requests at once and shows every picture that comes back. Reference pictures go in up to the number each provider accepts, with the ones you named first.
Why do pictures travel as file paths?
The obvious way to show a generated image in a chat is to send its bytes in the message as base64. That runs into two problems:
- The inline cap. A message between the agent’s host and the window has a size limit of about 1.5 MB inline. Four high-resolution PNGs blow past it.
- The token bill. Anything in the tool result is something the model reads. Four base64 images in a tool result spend a large number of tokens on pixels the model has no use for.
So the generate tool saves the files first and returns only their paths. The chat then gets a small surface event that says “show these images here”, and the window reads the files from disk itself.
Because the pictures are files in the conversation’s folder, they’re recorded in the session’s artifact manifest. When you reload, resume or move a conversation, the grid comes back. Anyone watching the session with you sees the same grid.
In the chat, a click opens a full-screen lightbox with zoom and pan (pinch or ⌘-scroll, drag, double-click, Fit, 1:1). Right-click on a grid gives you Generate 4 more variants (image to image from that picture), Open in editor, Save as… and Copy.
How does Tesseract get a real transparent PNG from any model?
Logos, icons and stickers need a background you can see through. Some image models can draw transparency directly and some can’t. Tesseract handles both, and you get the same result either way.
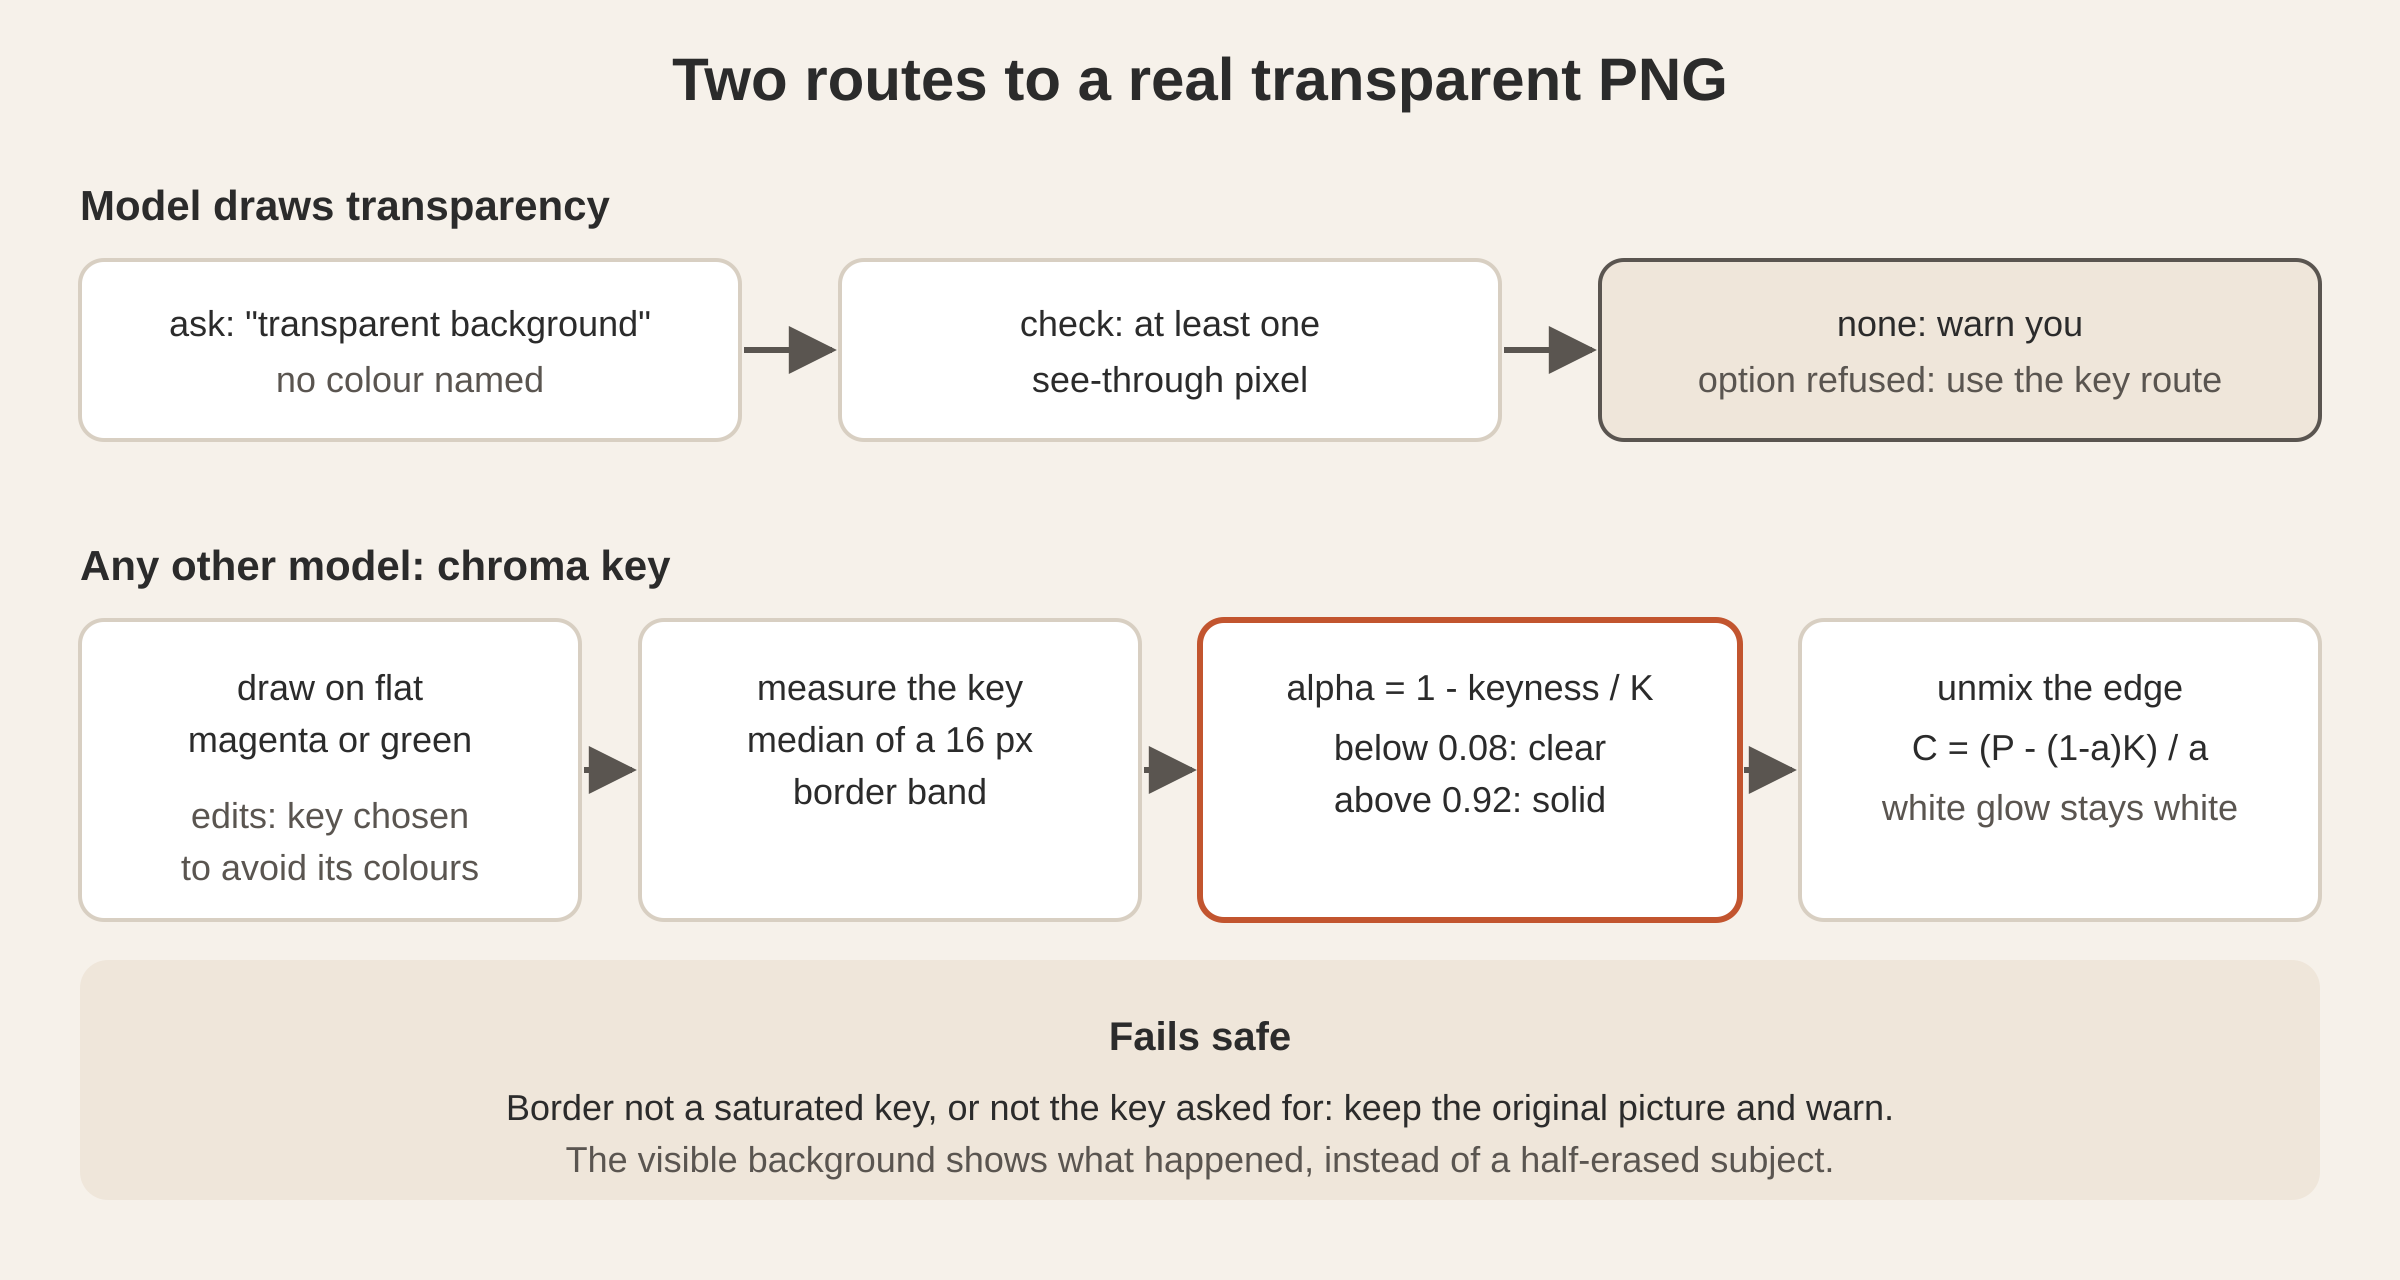
A model that draws transparency is asked for it in the request, and the prompt says only “transparent background”, with no colour. If you name a colour in the prompt, such a model paints the background that colour. Then Tesseract checks that the output has see-through pixels. If a model declines the transparency option (an older model set as an override can do that), the request is drawn again the other way.
Any other model draws on a chroma key. A clause added to your prompt asks for one single flat colour behind the subject, pure magenta or pure green, with no gradients, no vignetting, no texture, no shadows on the background, no floor line, and the subject fully inside the frame. Then four steps turn the key into alpha:
- Measure the key that was actually drawn. Generated backgrounds are never exactly the colour asked for. Tesseract takes the median colour of a 16-pixel band along all four edges as the real key.
- Compute alpha per pixel. For magenta, the “high” channels are red and blue and the “low” channel is green. A pixel’s keyness is the smallest high channel minus the largest low channel. It’s at its maximum on pure key, zero or less on colours that hold no key, and, usefully, exactly the blend fraction on a soft edge such as a white glow fading into magenta. Alpha is 1 − keyness ÷ keyness of the key.
- Clean the matte. Alpha below 0.08 becomes fully transparent, which removes background noise, and alpha above 0.92 becomes fully opaque, which makes the subject solid. Values in between are stretched across the range.
- Unmix the colour. A semi-transparent edge pixel still carries some of the key’s colour. Tesseract removes it with C = (P − (1 − α)·K) ÷ α. That’s why a white glow stays white instead of turning pink.
The result is an RGBA PNG with hard edges where the subject is solid and smooth partial transparency where it glows.
What if the subject is magenta?
A pink flamingo on a magenta key would blend into its background, so the key colour is chosen for the picture. When you ask for a transparent edit of an existing picture, Tesseract scans that picture first. It samples up to about 65,000 pixels and counts how many would be keyed out at least halfway by magenta and by green, then uses whichever key collides less. Ties go to magenta, the stronger default in our tests. The scan is deterministic arithmetic, with no model involved.
The cut-out also checks itself first: it runs only when the measured border is the saturated key colour that was asked for, so your subject always comes back whole.
How does the Generate an image maker get the size and the words right?
Two problems come up with every generated picture: it rarely has the right shape for where it’s going, and any words in it are often misspelled. The maker handles both.
Draw at the destination’s shape, save at its pixels. The image model accepts any size in multiples of 16 between 1:3 and 3:1. So the maker draws at the shape of where the picture goes, then saves it at the exact pixels that place wants. Nothing is cropped afterwards, so nothing the model placed gets cut off.
| Use | Drawn at | Saved at |
|---|---|---|
| Instagram post | 1088 × 1360 | 1080 × 1350 JPEG |
| Story or Reel cover | 1088 × 1936 | 1080 × 1920 JPEG |
| YouTube thumbnail | 1536 × 864 | 1280 × 720 JPEG |
| A slide | 1536 × 864 | 1920 × 1080 PNG |
| Website banner | 1536 × 864 | 1920 × 1080 JPEG |
| Print (A4 flyer or poster) | 1088 × 1536 | 1088 × 1536 PNG |
| A logo | 1024 × 1024 | 1024 × 1024 transparent PNG |
Each use also tells the model what to leave room for. A story keeps its top and bottom eighth clear for the phone app’s own buttons. A banner keeps calm space on one side for a headline.
Check the words letter by letter. After a picture with words is made, a model reads the lettering back. The maker then compares the letters itself: every letter of the words you asked for has to be there in order, ignoring case, spaces and punctuation. It never relies on a model’s yes or no. Asked whether the lettering matches, a model says yes to a near miss. When a reading differs only in accent marks, the lettering is cut out, enlarged and read again on its own, because small marks are what a reading of the whole picture misses. If a letter differs, one targeted edit corrects it. After that, the drawn lettering is replaced with real text in a typeface close to it. Its colour is picked to stand out from what’s behind it, with a soft glow where the background is busy.
Questions
Can I choose which image model the agent uses? Yes, in Settings › Image editing: a default provider, plus a model override for each provider if you want one. The agent always uses your choice.
Why does it make four pictures? Four is the default count. Ask for one, or up to eight, and the agent passes that number.
Are generated pictures marked as AI-made? Yes. Each saved picture carries the IPTC “trained algorithmic media” label in its XMP metadata, naming the model that drew it.
Where are the pictures saved? In the conversation’s own folder, recorded with the session, so they come back when you reopen it. Use Save as… to put a copy anywhere else.
Which models can make a transparent PNG? All of them. A model that draws transparency is asked for it directly. Any other model draws on a flat key colour that Tesseract turns into real alpha.
Try it
Ask for “a flat icon of a paper plane, transparent background” in any Tesseract chat. Download Tesseract, see what else it makes, or read whether you need an AI subscription to use it.