 Tesseract
How the image editor in Tesseract works
A layered image editor inside Tesseract: local tools, layers and filters, plus AI fills that change only the pixels you selected. How it all works.
Tesseract’s image editor is a layered raster editor built into the app. Selections, brushes, healing, shapes, layers, masks and filters all run on your computer at no cost. A single prompt box adds AI: it can fill a selection, change the whole picture, expand the canvas or restyle it with one of 204 styles. A fill changes only the pixels you selected.
This post covers where the editor opens, what it does without AI, how the AI actions are wired so the parts you want kept stay exactly as they were, and what it costs.
Where does the image editor open?
It opens in three ways:
- Any picture you open. A PNG, JPEG or WebP from the Files panel or a chat opens in an editor tab, with its layers, tools and history.
- A new picture. Home has a Create row, and its Photo editor card makes a new image document. You can also start one from the ⌘P menu.
- The end of a maker. Several of the guided makers on Home finish in this editor. Generate an image hands you an editable copy of the picture you picked. Enhance a photo opens the enhanced copy. The postcard and social-post makers open each picture they made. In every case the editor opens in the card beside the chat, so you can keep talking while you edit.
Each open picture has its own document: its layer stack, its selection and its undo history. That state lives outside the tab, so if you switch to another tab and come back, your selection and undo steps are still there. The colour picker and eyedropper share a list of your last ten colours.
The editor is part of the app, not a separate download. Editing a picture by hand needs no account and costs nothing. Only the AI actions call an image model.
What can you do without any AI?
Most of the work in an image editor happens without a model. Tesseract’s tool rail groups the tools the way most raster editors do:
| Group | Tools |
|---|---|
| Select | Rectangular and elliptical marquee, single row and column, freeform, polygonal and magnetic lasso, object selection, quick selection, magic wand; Select › Subject, Sky, Color Range, Focus Area; grow, similar, feather, expand, contract, quick mask |
| Paint | Brush, pencil, mixer brush, colour replacement, eraser, background eraser, magic eraser, paint bucket |
| Retouch | Spot healing brush, healing brush, patch, content-aware move, remove tool, red eye, clone stamp, pattern stamp, history brushes |
| Tone and focus | Blur, sharpen, smudge, dodge, burn, sponge |
| Shapes and paths | Rectangle, ellipse, triangle, polygon, line, custom shape; pen, freeform pen, curvature pen, anchor point tools, path and direct selection |
| Frame and measure | Crop, perspective crop, move, artboard, colour sampler, ruler, note, count, hand, rotate view, zoom |
Brushes are more than a round tip. You get shape dynamics, scattering, texture, dual brush, colour dynamics, smoothing, and pen pressure, tilt and rotation. Brush presets ship with the app, and brush files in the common .abr format load.
Most real edits happen in the Layers panel. It holds pixel layers, groups, 16 kinds of adjustment layer, solid and gradient fill layers, shape layers that stay editable, and smart objects. Masks have density and feather. You can clip a layer to the one below. The usual blend modes are there, along with the ten classic layer styles, such as shadows, glows, bevel and stroke. Layered PSD files open with their groups, masks, adjustment layers, styles, text and smart objects.
The Filter menu has the familiar families: blur, distort, noise, pixelate, render, sharpen and stylize. Liquify, Lens Correction and Vanishing Point are there too. Every filter runs on a layer, on its mask or inside the selection, with a live preview before you apply it.
How does the editor stay fast on large pictures?
Under the tools sits a pure-data document model: layers, masks, styles, comps and text, none of it tied to the screen. Pixels are stored in sparse 256 × 256 tiles that are copy-on-write. A brush stroke touches a few tiles and leaves the others shared with the previous history state. That’s why deep undo doesn’t hold a full copy of the picture per step.
The layers are composited on the GPU through WebGPU. A CPU compositor does the same work more slowly and serves as the reference, and the GPU result is tested against it. The non-destructive effects on layers run on a shared effects engine with 307 effect definitions. The video editor uses the same engine for clip effects, so an effect behaves the same on a photo and on a clip.
Two jobs that often go to a server run on your computer:
- Smart selection. Clicking an object to select it uses a segmentation model on your machine. Nothing is uploaded.
- Background removal. Remove background runs a local model too. The first time you use it, the app downloads the model once (about 81 MB) into its own asset store, and the editor shows you while it downloads.
There is also a Develop panel for photo-style adjustments: profiles, the global sliders, auto tone and white balance, curves, local masks, presets and a before/after view. You use it without leaving the editor.
What do the AI actions do?
The AI sits in one prompt box. What happens when you press it depends on the state of the picture, not on a mode you have to choose:
| The picture | You type | What the editor does |
|---|---|---|
| Has a selection | ”a wooden bench” | Fill: sends the picture and a mask of the selection; only the selected pixels change |
| Is blank (one flat colour) | “a lighthouse at dusk” | Generate: draws a new picture in place |
| Has content, no selection | ”make it winter” | Edit: the whole picture is changed as you asked |
| Any | (press Expand) | Expand: the canvas grows by a quarter of its long side on every edge and the model fills the new border |
| Any | (pick an effect) | Restyle: one of 204 styles, or one you wrote, applied to the picture |
The AI menu has a separate Generate image… item. On a picture that already has content, it opens the result in a new untitled tab, so your work isn’t replaced.
A Transparent background toggle covers icons, logos and stickers. When the toggle is off, the editor asks a language model whether your prompt implies transparency, such as an explicit request or an icon, logo, cursor or sprite. If the answer is yes, the editor turns the toggle on where you can see it. This is a model reading the sentence, not a keyword list. When you switch the toggle on yourself, your choice wins. Under the toggle, a model that can draw transparency is asked for it directly, and any other model draws the subject on a flat key colour that is then turned into real transparency.
Every AI result becomes a new layer at the top of the stack and one step in the history, labelled with the action (“AI fill”, “AI edit”, “AI expand”), so a single undo takes it back. Your hidden layers are kept. When the canvas grows, they shift with it, and Expand uses the model’s whole picture, so the extended scene reads as one. A precise selection and a short, concrete instruction (“a wooden park bench, facing left”) give the most controlled result.
How does an AI fill change only the selected pixels?
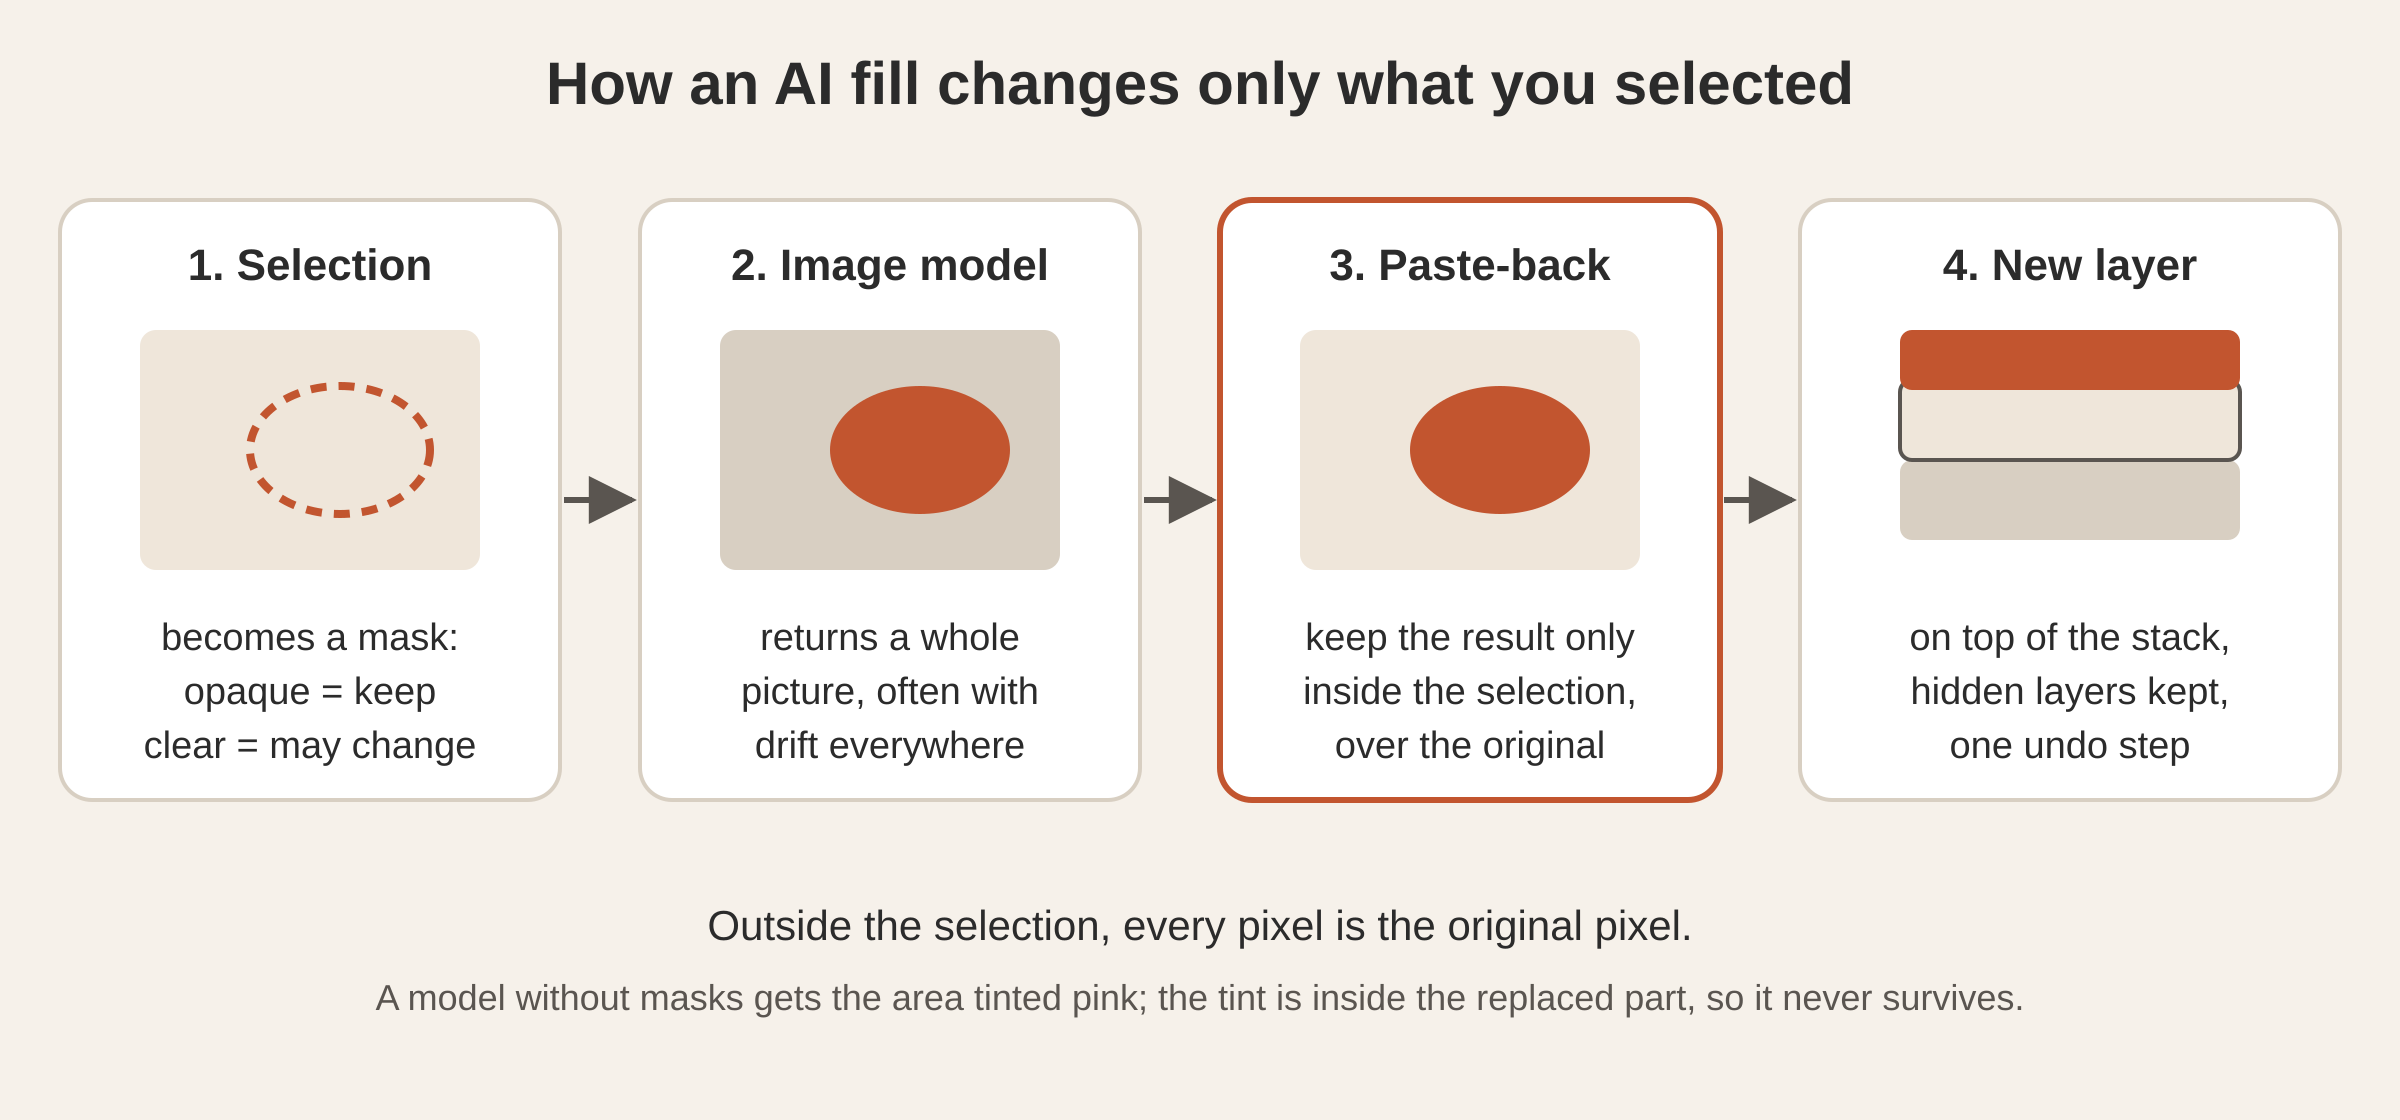
Image models don’t edit in place. Even with a mask, many return a whole new picture: the part you asked for, plus small drifts everywhere else, like a slightly different sky, a shifted tone or a softened edge. With a model that takes no mask at all, the whole picture is redrawn. If the editor used that result as it came, every fill would degrade the rest of your image a little.
So the editor never trusts the model with the pixels you didn’t select. A fill works in four steps:
- The mask. Your selection becomes a mask in the format the models expect: opaque where the picture must be kept, transparent where it may change.
- The call. The flattened picture, the mask and your words go to your image model. A model that takes no mask gets the picture with the selected area tinted a semi-transparent pink and an instruction to edit the highlighted area.
- The paste-back. The model’s full result is scaled to cover the original’s frame, keeping its aspect ratio so a result at another resolution still lines up. Then it’s cut down to the selection with a
destination-incomposite and drawn over the untouched original. Outside the selection, every pixel is the original pixel, byte for byte. The pink tint only ever existed inside the area that gets replaced, so it can’t survive into the result. - The layer. The merged picture lands as one new layer, and your hidden layers are kept.
The compositing operators are the standard Porter-Duff ones from the W3C Compositing and Blending specification. With this, any image model becomes a clean local inpainter, whether or not it supports masks natively. A soft-edged selection blends naturally, because the paste-back respects partial selection values.
How do the 204 AI styles work?
Each style in the Effects gallery is a written instruction: “Restyle this image as …, keeping the same subject and overall composition.” The instruction does the work, and the gallery is a way to find the right one. They fall into nine categories:
| Category | Styles |
|---|---|
| Painting | 31 |
| Photography | 28 |
| Materials | 25 |
| Formats | 24 |
| Animation | 22 |
| 3D & Digital | 21 |
| Modern Art | 20 |
| Trending | 18 |
| Retro & Era | 15 |
The gallery can be searched, and it remembers the styles you used recently. Next to the AI styles is a short row of local effects (duotone, posterize, sepia, vignette, blur and sharpen) that run instantly on your computer and cost nothing.
You can also write your own. A custom effect is your instruction plus a name. The editor renders its preview on the same reference photo the built-in styles use, so it sits in the gallery like any other. Custom effects are saved to your account, so they follow you to your other computers.
What does it cost to use?
Everything in the editor except the AI actions is free and runs locally: selections, painting, retouching, layers, filters, Develop, smart selection and background removal.
The AI actions (fill, edit, generate, expand and the AI styles) each make one picture with an image model. They need either credit on your Tesseract account or an image key of your own, added in Settings. If neither is set up yet, the editor tells you which to add. Our post on whether you need an AI subscription explains how your own AI and Tesseract credit fit together.
Questions
Which parts of the image editor work offline? Everything except the AI actions: selections, painting, retouching, layers, filters, Develop, smart selection and background removal (after its model’s one-time download). Fill, edit, generate, expand and the AI styles use an image model.
Will an AI fill change parts of my photo I didn’t select? No. The model’s result is cut to your selection and pasted over the original, so every pixel outside the selection stays exactly as it was. A feathered selection blends at its edge.
Can I open PSD files? Yes. Layered PSD files open with their groups, masks, blend modes, adjustment and fill layers, layer styles, text, shapes and smart objects.
Where do my own effects live? In your account. A custom effect is a name and an instruction, with a preview rendered on the gallery’s reference photo, and it syncs to your other computers.
Which image model does the AI use? The one set in Settings › Image editing, whether that’s your own key or your Tesseract account. The editor never switches providers behind your back.
Try it
Open any picture in Tesseract, select a part of it and type what should be there instead. Download Tesseract for Mac, Windows or Linux, or see what else Tesseract makes.